Stylist Susan Elijas shows how to create a new chair covering in eight steps, using a fine-looking hemp fabric from Hemptech
You will need:
- An old chair
- Approximately 1 x 2.5 metres of sturdy fabric (depending on size and style of chair)
- Sewing machine and thread
- Sharp scissors
- Staple gun or upholstery tacks and hammer
- Pliers or staple removers
- Dressmaking pins


- First catch your chair. Remove existing fabric to use as a pattern (leave on chair if necessary to maintain chair’s shape). Lay fabric out right-side-up. Place chair base or pattern upside-down on fabric. Cut enough fabric to cover the front and sides of each piece; allow plenty of fabric to secure neatly. Sand, paint or oil chair arms or legs as necessary.
- Pull the fabric up firmly and pin underneath the base (first pins), working around each side. Mitre each corner by bringing the sides together and pinning along the corner edge (second pins). Mark the front of the base with double pins (third pins).
- Once the four corners are pinned, remove first pins, take cover off and put back on the base the right way around to check the fabric sits taut and smooth. Sew the four corner seams, removing the second pins as you go.
- Put the cover on the base inside out one more time to check the sewn seams are in the right place, before cutting off excess fabric (leave approx 2cm from the seam). Zigzag stitch inside seam for added strength.
- Turn cover right-side-out. Put cover onto base and remove third pins. Turn base upside down. Starting in the middle front, pull the fabric tight and staple or tack into place. Work from the front to the back so you can tidy any overhang at the back where it is less visible.
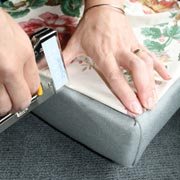
- Fold corner fabric tightly, one side over the other, and staple or nail into place.
- For an extra tidy underneath (especially when covering rocking chairs where the underneath is sometimes seen) cut a contrasting fabric to fit the shape of the base, fold raw edges under and fix into place.
- Lay the remaining fabric right-side-down. Place the backrest panel or pattern front-down on fabric. Trim fabric to shape, fold edges and fix in place. (You may choose to stitch along this edge before stapling.) If the back of this panel will be visible, first paint the back panel or cover with extra fabric (repeat step 7).